Our Kitchen Renovation
We moved into our small 3 bed detached 1930's house in the Essex countryside back in 2019.
Before we even found a house that felt right for us, and of course within our budget I had already started imagining it, and started to put together a vision/mood folder.
I find these vision projects really help me to feel more positive when things get hard and the roller coaster ride of finding and buying a house for the first time was a very difficult road to navigate.
It took us over a year to find the right fit for us, the house that ticked lots off our check list, that also had the right layout and potential to make improvements to put our own stamp on it and the property that just "felt right".
In the end we were lucky enough to find and buy the house the felt like home as soon as we walked around it while viewing. As they say the rest is history.
Once we moved in we started renovating but in this blog I will be concentrating on our kitchen renovations, if you would like to see more keep your eyes peeled for our other house improvements including our dark and moody "in the forest" themed downstairs loo renovation and our "in the clouds" master bed room renovation.
Stage 1: Mood board & Planning

I started to really think about the changes I wanted to make and the look I was hoping for regarding my kitchen. I started to gather together lots of ideas of colour and style in a large A2 folder.
I used Google, Pinterest and magazines to help me start piecing together ideas. I also started to follow professional interior designers on social media and joined a few facebook groups full of like minded people like Farrow and Ball and Little Green groups where you can get lots of ideas from and where you can also ask peoples opinion on colours and paint types and brands.
I then started to order colour charts, floor samples and started to print off images of kitchen designs I liked. We also started to visit kitchen companies in Colchester to see what styles were popular and gain more ideas.
We visited all different types of kitchen companies from high end to more affordable as I believe you can gather so much information form these people and it is very good way of getting a feel for the companies customer care and workmanship before deciding which company we would like to invite to our house to measure up and start to get some estimates.
Style And Ideas
Our existing Dining Table in Portland Grey

Colour and Design
After looking at kitchen cupboard colours in the showrooms, I decided I really loved the smokey forest Kombu Green for my kitchen cupboards and worktops to be Portland white all by the great kitchen company Granite Transformations.
Granite Transformations had previously made our granite covered extra large dining room table just over 5 years ago in Portland Grey and we already had soft grey dining chairs that we absolutely love.
We decided rather then match the worktops we would find something that would look great together and Portland white was the natural choice.
Our New Worktops and Splash Back in Portland White

So I started to collect a few ideas regarding colours to go with the Portland White worktops, Portland Grey dining table with soft grey dining chairs and the Kombu Green cupboard doors. This was the start of my style and colour plan coming together for my kitchen renovation.
Paint colours
I love colour drenching, this is when you paint all the walls, doors, skirting and ceiling in the same colour.
Colour drenching is a strong look but is also very cosy as it stops you having hard white lines around the walls and white glaring ceiling. To me it really looks and feels thought through and finished.
I started to look into green paint colours to compliment my Kombu green door sample Granite Transformations had leant me.
After many different brands and many different shades of green, I found Green Smoke by Farrow and Ball which I loved and looked great next to our kitchen doors.
Next I found a few accent colours that look great with the greens and this is when I found blush/nude pink and Matte black looks fab with the green and gold/brass accessories.
Farrow & Ball Green Smoke Paint

Everything then fell into place and I started to lean towards brass door handles, lamps and accessories. Blush pink bits dotted around the kitchen like soap dispensers and vases. Green walls, ceiling, skirtings and doors. Matte black sink, tap, blind, light fittings, appliances, radiators and back door frames.
Style
I wanted to go for a modern but cosy feel, with some detail on the cupboards but not too much as I had in mind a patterned and busy looking tiled floor so wanted to keep walls a little understated.
Cupboard Doors

We decided to have Oakham style cupboard doors as they had a tiny bit of detail with the picture frame look but slim for a simple but classic look.
I wanted a nice cornice or pelmet at the top of the cupboard again for a classic look.
Pelmet & Cornice

We knew we wanted very tall large floor to ceiling cupboards along one wall so again this made me feel that I didn't want too much detail on the doors.
Stage 2: Changing The Layout
Before

After

Layout
We wanted to change the layout of the kitchen, diner and orangery/conservatory. By opening the whole area up into one large open space but with a large arch zoning the kitchen from the dining area.
The previous owners used half of the space for the kitchen and half for the dining area and the whole of the orangery/conservatory as a child's play room/ garden room.
That worked for them perfectly but we wanted to achieve much more storage for the kitchen, a better flow of light, movement and more of a view of our garden.
Knocking walls down
Before and During Construction

We decided to knock down the wall and take out the double doors and windows that linked the kitchen with the garden room to open it up.
This straight away gave us un-obstructed views of our garden from most of the house.
Even from the front room and the hallway when all doors are open we can see right into the garden and onto the fields beyond.
After Construction

Taking down this wall also gave us loads more light into the kitchen. Next we wanted crittall style doors and windows out to the garden to give a modern but also heritage look to the back of our house.
New windows and Doors
Before and During Construction

We wanted to change all the original country style windows and doors to a more heritage modern crittall style. We wanted to knock out the brink work so we could have floor to ceiling glass looking out to the garden. After some research online for window fitters local to us, we ended up picking 3 different companies to come and measure up and give us a quote.
After all companies had visited us we ended up choosing Hadleigh Glass as we found them to be very informative and also recommended that the five white pillars that had to stay as they were weight-bearing could be cladded in black steel inside and outside to help the whole thing look seamless this was an amazing detail as the other companies just suggested that we painted them black and that just wouldn't have looked professional.
Inside View Before

Inside View After

Inside View Before

Inside View After

New Small Window
So we also wanted to replace the small kitchen window to match the back of the house. While we started planning we decided we wanted the granite splash back to cover the entire wall and into the window profile so we removed the windowsill and all the tiles around it.
Before

Now

The Outside
After the windows and back doors where fitted I then decided to paint the outside walls black, this was a very bold move and I was pretty scared of doing it. But I looks amazing and I am so glad I was brave and did it. Then we had Matt from MJA Property services round to remove and replace our old cladding to black to match the windows and the walls.
We then had Josh from The Mils Decorating to prep and repaint all the outside woodwork including the fascias black to match and now it look really slick and modern.
Before

After


Cladding and Woodwork

Then the last finishing touch for the outside was to change the outdoor spot lights in the fascia boards from rusted sliver to black so we had Mason from OJF Electrical to change these spot lights and they look amazing.
Last thing we need to do is paint the upstairs outside wall up by the roof and our bedroom window, this is going to take a lot of scaffolding and the professionals in spring to do. But here is my amateur mock up of how cool it will look once its is all finished.
We will be getting in touch with Josh from The Mils Decorating as soon as the weather improves.
Mock-up

Bricking up one side
Back inside the kitchen we wanted to brink up the left hand side wall of the dining room as the view from those windows were just looking out into bushes.
We thought that this wall would make a lovely feature wall and will be warmer too. Matt from MJA Property services to come in to knock out the windows and frame, fill with insulation, block up and plaster. He did an amazing job and we love it.
Before and During

Panneling
Then I decided to have the feature wall panelled for a bit of texture and interest.
After some online style research I measured up and made a mock up of a design for Brad from Watts Carpentry & Construction to come and panel up for me and we love it.

Now

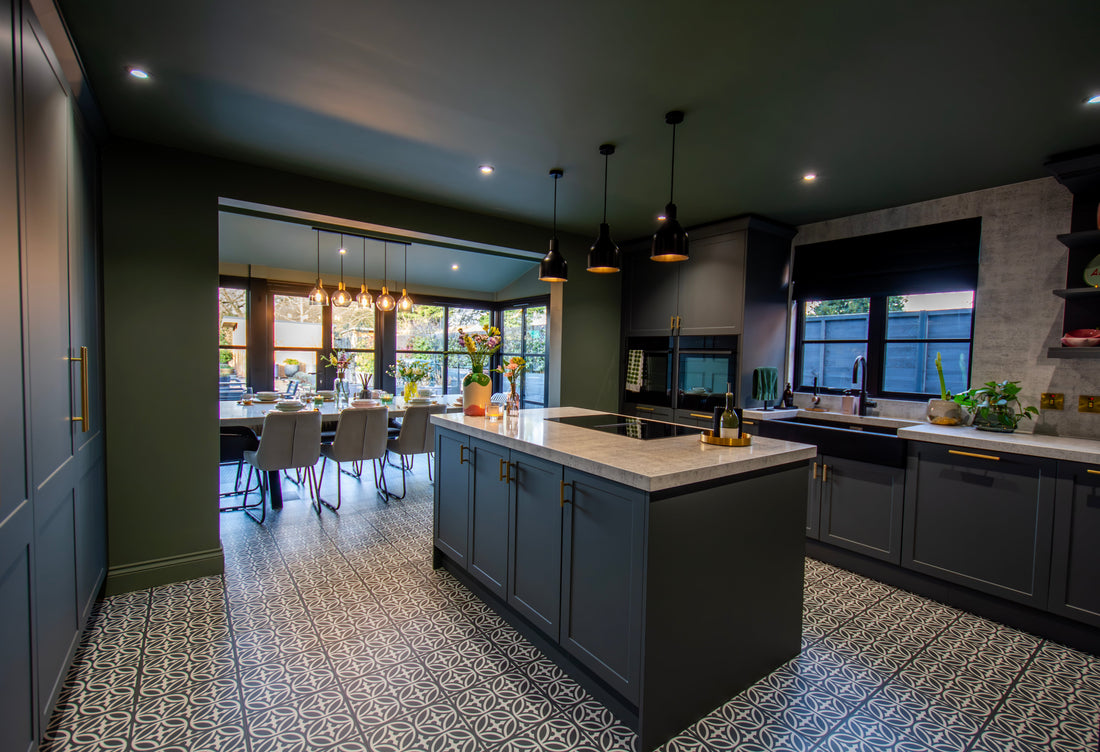
Kitchen Island
We inherited a wooden kitchen island but wanted to have a much larger island built in with more cupboards/drawers and also we wanted to move the hob onto the island.
We started to look into induction hobs with downdraft extractors so we could avoid the large extractor fan above the island.
These type of hobs are very popular now and have come on in leaps and bounds. While researching these hobs we made sure we went and saw them in action to access the noise and practicalities.
Before

It was a difficult decision to make regarding size and position of our new kitchen island.
I knew I wanted it to be large enough to have our hob and space for dishing up dinner, chopping veg and a little space for a vase and flower display, so we had a massive MDF board 175cm by 105cm and laid it on the floor and worked around it for a few days it really helped us visualise the size and position.
Visualising

After

Lighting
We decided to move all the positions of the spot lights and I also wanted extra lighting for a set of three pendents over our new island and a set of five pendants over the dining room table.
Above the dining table there is a beam which I had put hooks in and regularly hang flower displays and battery pendant lights from and loved the look so I wanted this to be a permanent feature.

This meant a lot of holes made by the electricians Mason and Olly from OJF Electrical, this was scary seeing all the holes in the ceiling but as we were completely renovating now was the time to get everything in the ultimate place, it was now or never so we went with it.
While Mason was here we planned out where sockets needed to be moved to for appliances and the extra sockets I wanted, including one set on the side of the kitchen island and inside the cupboards for coffee machine, microwave and hoover charging so more holes and wires to be made and arranged in the right positions before kitchen was fitted.
We were also re-positioning the ovens, washing machine, tumble dryer, hob and fridge too.
Lights In Detail

I found these beautiful pendants from Industville online. I wanted the 3 pendants over the hob and the 5 pendants over the dining room table to be similar but not completely matching as I still wanted the area zones to feel different.
So I went for matte black cones with black knurled attachment and black cord for the pendants over the island and then chose the glass pendants with the gold knurled attachment with black cord for the pendants over the dining room table.

They look so good together with the matching texture of the knurled and the shape of the cones but still feel different. I absolutely love them plus the knurled detail matches our cupboard handles so there is consistency with the detail.
Lights Together

We then found some gorgeous matte black radiators from Victoria Plumbing that look great against the smoky green walls and the black spot lights.
Spot Lights

Radiators

We had the spot lights in the ceiling and the pendants lights on different switches so they can be put them on separately for mood soft lighting in the evening and I love that detail.
Cupboard Handles

We found these lovely knurled detailed handles from Dowsing & Reynolds these are stunning.
They are called Gold SkyScraper handles and are really good quality and look amazing on our Kombu green cupboards and next to our smoke green walls, plus the style of these handles match our knurled light fittings.
Electrical sockets
We brought all our brass light switches and sockets from Electrical 2 Go that also have a handy USB port for charging phones and many other electrical appliances.
I had a double socket with USB port put on the side of the island as I knew I wanted the option to add a lamp to the island and so glad I did.

Stage 3: Our Kitchen By Granite Transformations
So we chose Granite Transformations as our kitchen suppliers and fitters.
I love that they have their own fitters unlike other companies that source out the fitters to a middle company or leave it to the customer to source. They have their own team of fitters that work all day with the same cupboards and granite worktops.
They also sourced all our new appliances, sink and tap we wanted.
Before Granite Transformations

During Our Renovation

After Granite Transformations

Granite Transformations offer many different services to suit all sizes of renovation from just (making over) a kitchen by replacing kitchen cupboard doors, overlaying kitchen worktops with granite or quartz to new kitchens like ours building bespoke cupboards and drawers.
They also have a massive range of colours and different style cupboard doors and composite granite work top over lays which are amazing.
We had bespoke cupboards installed along the whole length of one wall. These are going to house our coffee cupboard which also includes an integrated microwave, our washing machine, tumble dryer, a cupboard for our recycling bins and a hoover charging station.
All stored out of sight in our lovely floor to ceiling cupboards.
Wall Before

After Granite Transformations installed our wall of cupboards

Our Hidden Coffee Cupboard
We wanted a cupboard to house our coffee machine, microwave, mixer and toaster plus everything else that we didn't want out on show on the work tops.
We had a lovely coffee cupboard built in with handy deep draws for our mugs and handy door shelving too.

Our Hidden Utility
We also wanted to have our washing machine and tumble dryer within cupboards and not on show. We wanted them off the floor to save us bending over and next to each other so when transferring clothes from one machine to the other is easy.
Because of the type of cupboards, we did have to have the machines about 20cm higher then planned which at the time we didn't think would be a problem but it is a slight problem, it means it is a little hard to see the draw dispenser while filling it with fabric conditioner so take this into consideration if you choose to install your machines this way.

We brought some vibration mats to stand the machines on to help stop too much vibration from the spin setting, we are doing a slightly light spin on our washing to prevent unnecessary machine movement.
This side of our kitchen is right next to our downstairs toilet so the drainage from the washing machine and tumble dryer goes straight out and into the waste pipe linked to our toilet waste which worked out perfectly.
We have shelves above and deep draws under our machines perfect for storing our Tallow & Ash fabric shampoo and conditioners and cleaning products.
I also plan on fixing a fold out drying rack on the inside of the doors to hang clothes on while drying them and maybe a pullout flat draw for a folding station.
Worktops
Our Old Wooden Work Tops

Our New Worktops

We had old wooded worktops and white subway tiles as a splash backs but the gorgeous Portland White Granite really bounces the light around the kitchen.
The worktops and splash back covering the whole wall that is exposed plus into the window and it covers our windowsill and gives a really clean but luxury finish.
Portland White Worktops and Splash Back
Stage 4: Adding Appliances
Neff Hob

We decided the NEFF 80cm 4 zone Air venting induction hob suited us and we have been very pleased with it.
Quooker Tap

We chose to install the Quooker Flex Matte Black Tap with the Extra Cube. This tap is a 5 in 1 tap. It does Normal tap, Hot and Cold, Boiling Water, and the CUBE gives you Filtered Still and Filtered Sparkling Water.
We chose the THE FLEX style tap as I love the pull out flexible hose to rinse and clean down our large sink and the matte black to match other accessories around the kitchen like our sink, lights and windows.
Read my full review of our Quooker Tap
Ovens

We chose to install 2 x NEFF N70 Slide and Hide electric single ovens next to each other, and around a meter off the ground.
We chose the grey graphite colour it is a dark grey/silver as I didn't want any light silver on the oven because a dark coloured oven with minimal details would look better with our style kitchen.
NEFF Slide and Hide Ovens

We love these ovens with the slide and hide they are so much easier for me as I am only 5 foot tall with short arms so the slide and hide helps me to stand much closer without a door between me and the inside of the oven. The slide and hide helps to give easy access to the oven shelves.
Also I love the built in Self Cleaning Mode which is a game changer and the Keep Warm Mode which is great for when I have cooked for my husband and he is running late to keep his dinner warm until he arrives home.
Blanco Vintera XL 9 Sink

We chose the Blanco Vintera XL 9. We had a large butler sink in our old kitchen and I loved the look and the size so we went for the look of a butler sink with a modern twist.
The Vintera has a skirted/apron front to give the illusion of a butler farmhouse sink.
We went for the matte black that has a gorgeous stone textured look close up.
Silgranit Close Up

The Vintera XL 9 is made from Silgranit which is a composite material made of up to 80% natural granite and has a stone like look and feel to them.
This sink is super large 90cm by 51cm which I absolutely love. We had it under mounted as we prefer that look.
The black colour does show a few water marks but I have found it super easy to clean, I use the organic Kit and kin washing up liquid with a soft brush and then rinse round with water and once dry I wipe over with a dry window cloth.
My Flex hose tap is fantastic for rinsing around my large sink.
Stage 5: Painting and Decorating

We chose Green Smoke by Farrow and Ball because it is a stunning green with grey and blue under tones as well as amazing depth, It feels royal and grand but also modern.
Farrow and Ball's Green Smoke looks amazing with our Kombu Green cupboard doors from Granite Transformations, it also looks great with our black metal window and door frames and gold handles.
I wanted the walls in the kitchen to compliment the colours from our garden and to make the inside and outside blend nicely as we have lots of views from our kitchen out to the garden and the fields beyond. Green Smoke really looks great with our garden back drop, I am looking forward to seeing my garden and kitchen in the summer when it is in full bloom.
Dead Flat Paint Finish
After choosing Green Smoke we then had to choose the finish. We went for the Dead Flat finish which only has a sheen of 2% so it really is super matte. Dead Flat is ideal for colour drenching as it is multi-surface so it can be used on walls, ceilings and woodwork like doors and skirtings.
Colour Drenching
We went for the colour drench look as I spoke about in the beginning of this blog, I really love the drench look by using the same colour on the ceilings, skirtings and doors. Colour drenching is a strong look but I find it cosy as it stops you having harsh white glaring ceilings that distract your eyes.
The Mils Professional Decorating

For our painting and Decorating again used The Mils Professional Decorating a local company. Josh and the team are amazing. They are very professional and really spend time on the most important step the prep. It was so worth getting these professionals in as I was a little worried about using this great quality but also high end paint, in the dead flat finish incase it looked patchy at the end.
Josh did an incredible job and the finished result is so beautiful. The dead flat finish looks so good everywhere.
Josh worked very professionally and is so tidy, he cleaned and cleared up at the end of every day before leaving. He was also very mindful in covering and protecting all our worktops and surfaces with lots of plastic sheeting and tape.
The photos don't really do the painting justice as in real life it is just stunning.
Stage 6: Flooring

We originally had big terracotta old tiles on the flooring in our kitchen and dining room. We hated them, but everyone that visited us loved them. They were too country farmhouse style for us.
The old tiles would have been a nightmare to remove so we had the flooring screeded/ levelled and then our new tiles over the top also helping with more insulating due to more layers.
We decided to have LVT (Luxury Vinyl Flooring) as we have used that type of flooring in our hallway, office and downstairs cloakroom and we have been very happy with the easy clean and low maintenance this type of flooring offers. I really wanted a tiled victorian style flooring, a statement floor and this why I kept the cupboards and walls of the kitchen more muted in style so it could take a more busy styled flooring.
It was hard to find the right colour and style of flooring during our renovation. I had lots of samples send to my home but these samples are normally very small or just show you the shade and not the pattern so I decided to wait until after the kitchen was installed and the walls painted before deciding what shade of floor we wanted.

Once our kitchen was installed it was time to really think about the flooring this is when we found LVT Walbrook Pastel Black by Harvey Maria.
Our local store LT Flooring allowed us to bring home a few different samples of their flooring for us to lay down by our cupboards and walls to help us visualise it.
Among these samples was Walbrook pastel black and a gentle off white pattern and it was exactly what I was looking for and looked so good next to our Kombu Green kitchen doors, Our Green Smoke walls and all the matte black door frames.
LT Flooring did a great job at laying our floor and we are so happy with it.

Stage 7: Accessories & Finishing Touches
Interiors
Keeping with the Gold, Black, Green and blush pink colour theme, I have gathered together a small collection of little pieces of interiors for decoration and display pieces that are multi-use. Vases are a great way of adding colour or texture to work surfacers with fresh flowers or dried flowers or a few on a shelve as storage but also as arty interest.
I have a flower subscription with Bloom and Wild a company I have used for over 8 years now and love them, so I am lucky enough to have fresh flowers delivered monthly and use them as decoration for my kitchen.
Make sure you cut the stems down and give them fresh water and feed every 3 days to keep your flowers living longer.
I purchase cut flower feed from a fantastic company called Norfolk Natural Living they also offer feed for indoor and outdoor plants and lots of other organic natural products.

I love fresh flowers and use lots of little vases scattered around in the corners of my kitchen as well as the island and the dining table. Using lots of small vases of different texture shapes and sizes is a great way of making one bunch of flowers spread throughout your kitchen instead of one vase and one bunch with only one vocal point.
I personally I am not a fan of faux flowers and prefer fresh or dried, just my personal opinion.
All different types of indoor plants also work really well in kitchens. Over the years I have had many indoor plants , some lived and some die! I think its about finding the right plant for the space and which ones you can keep alive. I need plants that are hardy and almost un-killable.
I purchase my indoor plants from Patch Plants, I love this company and often contact them for advice. At present I am trying plants that live in water rather then soil the reason for this is because I had an issue with soil gnats flies in some soil around a pot plant, so I decided to only have plants in water. Plus plants in water are so easy to look after as you just change the water when it needs it so there is no chance of forgetting to water and killing plants that live in soil.
I have purchased from Patch Plants a Hydroponic Anthurium white, Hydroponic Anthurium 'lilli' and a Epipremnum Aureum (devils ivy) all living in water in my kitchen. Also Patch plants do kitchen starter bundles of plants perfect for all kitchens.
I have also used wicker baskets, wooded steps and chunky oak chopping board to add natural texture and earthy feel to the kitchen.
My vase collection I have purchased from many different places like garden centres, supermarkets, Bloom and Wild and high street shops.
Table Settings

Again sticking with the Gold, Black, Green and Blush pink theme here is my table setting.
I have incorporated gold spots, mint green and blush pink plates and bowls and my glassware is gold dripped. Also adding candles and fresh flowers to the dining table.
More Interior Ideas

This photo is showing my interiors in my kitchen, I have a gold lamp from Abigail Ahern, wellbeing pod and candles from Neom, a set of black salt and pepper electric grinders from Peugeot and an olive oil decanter bottle from Borough Kitchen.

Photography
We had the pleasure and felt so lucky to have the lovely Alison Self Photography visit us to take some wonderful professional photos of our finished kitchen.
I have used a mixture of my own and Alison's photos for this blog but will end this blog with a few more stunning photos taken by the very talented Alison.
Thank you
Thank you for taking the time to read my blog and I hope you have found it informative and inspires you to update or fully renovate your home.
If you have any questions or comments please get in touch.
love nicola x


